NEW Preparation H® Medicated Wipes for Women.
Got to try these for free to share my opinion. Please click the link above to find out more.
NEW Preparation H® Medicated Wipes for Women.
Got to try these for free to share my opinion. Please click the link above to find out more.
 This is one of my favorite summer time desserts to make. It’s not too heavy and it’s refreshing. It’s also super easy to make. I’m all about baking from scratch, but where I can make it a little easier on myself I do. So here I use a pre-made graham cracker pie crust because I find it’s just as good if not better, than one I’d make. But please feel free to make your own.
Lemon Blueberry Cheesecake
Directions:
Notes: Sometimes if I feel the cream cheese isn’t fully incorporated I will use my stick blender to get it creamy and smooth.
 You can also turn these into bars by using a 9×9 square baking pan and pressing the graham cracker mixture into just the bottom of the pan and following the rest of the recipe. Bake at 325º for 35 minutes.


As I sit here typing it is an outrageous 99ºF outside! I mean c’mon! I’m basically in Portland, ya know, where it rains all the time. Wrong!!! I’m thanking God, and my local hvac guy (dude who installed my new furnace last November) for my wonderfully efficient central a/c! So, I’m pretty much holed up in my cool house and craving something sweet. But I don’t want to turn on the oven to bake something or work up a sweat over the stove top cooking fudge or that Panna Cotta recipe I want to try (I so can’t wait to try my hand at that).
So, I thought it’d be a perfect day to whip up a batch of some yummy Muddy Buddy Chex Mix, (aka Puppy Chow I’ve recently learned). I’ve only made it a time or two with the typical semi-sweet chocolate chips called for in the original recipe. But I only had white chocolate chips on hand. So, I swapped the semi-sweet chips for the white and followed the rest of the basic recipe. Let me tell you, this is so easy and quick to make I don’t know why I don’t make it more often. Probably because I usually don’t have a whole box of Chex cereal on hand, as you almost use the entire box. The best part is you don’t heat up your kitchen to make it and it makes alot! But that’s a good thing, because it’ll be gone before you know it.
Apparently, there are many different versions on the web you can use to tweak the original recipe, such as: lemon, cupcake batter, cookies n cream, fluffer nutter, cookie dough, samoa (you know those addicting Girl Scout cookies?), cotton candy, peppermint bark, strawberry shortcake, red velvet cake, Butterfinger (omg!) … *takes a deep breath* … and so on. Also, for all you gluten sensitive people out there, these are gluten free (unless a variation of it uses gluten of course)!
White Chocolate Muddy Buddies
Directions:
Tips: If you love peanut butter like I do, use another quarter cup for a more peanut buttery taste. You can also use peanut butter chips instead and really get that peanut butter punch!
White Chocolate Muddy Buddy Pictorial

Gather your ingredients
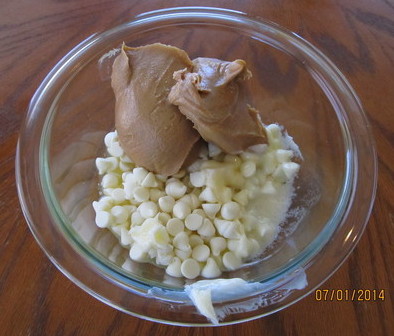
Melt chips, peanut butter and butter in bowl

Stir until evenly melted and smooth

Pour over 9 cups of Chex Mix in a large bowl

Toss until fairly well incorporated, but as you can see, not every piece is completely coated

Add the powdered sugar and gently toss until the pieces are well coated

Place in the fridge for as long as you can stand it.

And enjoy! Store (or hide) in the fridge for best results.
No, I’m not giving my daughter her first sip of a lovely Pinot Noir. Although I think the picture is cuter than all get out!
 She is enjoying Vignette Wine Country … Soda! A Pinot Noir at that. I received this lovely bottle of what is essentially a fancy grape soda as a gift from one of the families at my work. So, I decided to finally pop the cork… err, actually twist the cap off this bottle and discover what exactly is a wine soda. I shared it with my daughter’s who both enjoyed it, in fact the oldest has now laid claims to the remainder of it. The taste is of a grape soda, but not nearly as sweet and sugary. It’s lightly carbonated and doesn’t make you want to burp after the first sip, which is nice. I call this the grown up version of grape soda and it’s made with 50% juice. I don’t think it’s something I’d buy for myself, but it was a nice treat I enjoyed with my girls on a Sunday evening.
Before receiving this lovely gift I had never heard of “wine soda” before. I think it’s a cute gift idea that’s non-alcoholic, but is fancy like a wine, without being too “soda’y”. It’s along the lines of Martinelli’s Gold Medal Sparkling Juice, but more sophisticated, not as sweet and less carbonation.

Vignette Wine Country Soda
 Beer Bread, yes, beer bread. I don’t know about the rest of you, but I’ve never heard of this delicious bread before a few months ago. The name in and of itself sounds strange and well, I wasn’t too sure I’d like it, as I’m not a big fan of beer. But luckily I got to try it at one of my work potlucks. One of my co-workers baked some and brought it to work along with a stick of butter to slather on this wonderful creation. At first glance the thick slices looked dense and like it might be on the dry side. It almost reminded me of soda bread in appearance from the foggy recesses of my mind way back in my grade school days when a teacher would bake some for St. Patrick’s Day. So I didn’t have high hopes for it. But I dutifully tried a little bit of everything everyone brought in and grabbed a half slice of the beer bread with a little bit of butter spread on top. My first bite into the crunchy, buttery crust and dense, not dry at all, inside (almost biscuit like) I was very pleasantly surprised and instantly in love.
Fast forward the following weekend. I googled this wonderful bread recipe and found that many recipes pop up, most following the same basic recipe. So I grabbed the one that was most straight forward/easy and went to work. I was surprised at how few ingredients there were, which made me a little doubtful of my results. Maybe my co-worker used a different version of this recipe? So, I forge ahead, mixing all the ingredients together, pouring a stick of melted butter over the top of the dough, which again, made me raise my eyebrow and baked it as directed.
It came out beautifully! It was delicious! Buttery and crispy on the outside; a nice thick, crunchy and slightly chewy crust. And a nice moist, fluffy, light flavor bread inside with the slightest hint of the beer when I use the darker beers. I have now made this bread several times, using a variety of beers: Sessions Dark Ale, Pipeline’s Coffee Beer (the hub loves this beer, me not so much, but it makes a yummy beer bread!), Foster’s Lager or whatever I had in the fridge. For instance, today’s beer bread was made with some left over beer from a party: Pabst Blue Ribbon, again it came out yummy! I have found the darker the beer, the more flavor, which makes sense. So, even if you’re not a beer drinker, or don’t like a particular beer, it’ll make a scrumptious beer bread. My next beer bread I make I want to try a fruity beer, maybe raspberry or an apple ale. The only problem with this bread is… you eat way too much! 🙂
Happy baking!
Beer Bread Recipe
Directions: Preheat oven to 375ºF. Measure all the dry ingredients in a bowl and sift together with a wire whisk. Pour the beer of your choice into dry ingredients and mix together. Spread into buttered loaf pan. Pour melted butter over the raw dough and bake in the oven for 60 minutes. Let cool for a few minutes and enjoy.
Notes: I sometimes find that either the beer is only 11oz or there just isn’t enough moisture to incorporate all the ingredients well. So, I take the empty can or bottle and put some water in it, swish it around and add a little more to the dough mixture. Also, the original recipe calls for the whole stick of butter (1/2 cup), but I found it makes the crust too hard and crunchy. So, if you think you’d enjoy that, try it. Sometimes I use about a 1/3 cup of butter. You can play with the amount and see what works best for you.
Step by step pictorial:
 Gather your ingredients.
 Measure the dry ingredients into a bowl
 Whisk to sift all dry ingredients together
 Pour beer into dry ingredients
 Mix it all together
 It should look like this when all mixed together
 Spread evenly into bread pan
 Pour melted butter over raw dough
 It doesn’t look too pretty at this point, but have faith
60 minutes later….
 Yummy!

I wanted to share with you some other great freebie sites I use. These sites you have to register, share your interests, rate and review products etc. This might seem like alot to do, and you’re asking yourself why? Because, you get to try new products for FREE! I’ve received quite a few FULL size products to try. Not everything is full size though, about half are sample sizes. All in trade for your opinion. Which they want honestly, the good and the bad. Once you register and do the little tasks/suveys they want/need you to do, (so they can customize what products would fit best for you to check out), it’s quite simple and quick. I think the hardest part is to remember to check back occasionally to see if you have any offers to try and qualify for.
I recommend and personally use:
To break them each down:
BzzAgent – You sign up by creating a user name and password, give your demographic information, your household income, check a box to prove you’re not a robot (haha) and check the Terms of Use. Or you can connect via your facebook account. After that you take a bunch of surveys, that are usually quite short, so they can get an idea of who you are so they know what products would best suit you. They’re all shipped straight to your door via the USPS.
“I get to try cool products, for free, and even get coupons and special offers to share with friends. Then I make my voice heard by sharing my honest opinions about the great stuff I try with others, including some of the largest companies in the world.”
I joined back in December of 2013 and since then I have received FULL size samples of:
Every single one of those were FULL size versions of the products. Which is just awesome!!! So, the more surveys you take, the more reviews you give for products you received = the more products you will qualify for in the future. It’s so easy and fun!
PinchMe – Sign up by creating an account on their site or via your Facebook account (my preferred method). How it works: About every other Tuesday at 12 noon EST (9am PST for us left coasters) you will possibly (it’s not guaranteed) have a few products on your home page to put in your ‘box’ to try for free. You have to be quick though, because if you do have anything there, it’ll go quickly. I find I have to refresh my page a few times and it’s not necessarily best to hit it at 12pm/9am on the dot, as everyone else and their sister is too. Sometimes at :05 or :10 is better. But don’t wait an hour or three, because you’ll see that they are “Out of Stock”. 😦 Currently, new samples will be released Tuesday, July 15th 12pm EDT.
“It’s simple – you choose a product from one of our leading brands, and we then deliver it to your home or workplace for free. But be quick, we’ll reserve the products in your box for a limited time, to ensure that everyone has a chance of receiving the available products. Once you’ve tried, tasted or touched the exciting products we offer, you can leave your feedback. Start pinching now!!”
I joined this site back in December of 2013 and since then I have received:
All of these, except the 2 bottles of nail polish, were all sample sizes. But I still love them! Not just because they are free, but because they give me a chance to try new things before I buy them. And that’s the point. All I have to do afterwards is take they’re little follow up surveys on each product. They have many more items they offer, but I didn’t qualify for them, but you might!
Smiley360 – A lot like the previous sites. You sign up for an account or join via Facebook. After you give them your demographics you check back in with the site to see if you qualify for any products or services to try out, called “Missions”. This site leans alot on you sharing with social media (facebook, twitter, pinterest etc.) They also want you to share face to face. The point is to spread the word.
I joined Smiley360 back in January 2013 and some of the products I’ve received are:
Now this site has been the toughest for me to totally figure out, as I haven’t yet. I’m still learning and trying to figure things out. But somehow I keep getting Missions to try.
All of these sites are FREE. They won’t cost you a thing to join, except a little bit of your time. I am by no means a pro at any of these sites, but I do know enough to acquire some pretty nifty freebies. So, if anyone has any questions, I will do my best to answer and help where I can. And if I don’t know the answer, I will hunt one down for you!

Today I went to a new store in my neck of the woods because they sent me a coupon for a free bottle of Vitamin D and a free book, so you know I was all over that. While there I looked around and found they had produce that was either bruised or just starting to get that not so fresh look in bags for $2 each. There was mostly bags filled with various veggies: leafy green lettuce, avocados, onions, leaks, celery etc. Then I found the one bag filled with organic fruit! So I snagged it up quickly, paid my $2, got my free bottle of vitamin D and the book and went on my merry way home.
I got home and opened my bargain bag of fruit and discovered some nice looking peaches, including a white peach, nectarines, a plum and a banana. The peaches had a small blemish, the white peach wasn’t that great, so it got tossed sadly, nectarines had a small bruise and the plum was in pretty good shape. The banana was just barely starting to turn from bright yellow to the darker yellow with a few tiny dark spots, it’ll make a perfect smoothie for later.
As I start to cut into a peach to enjoy I realize, these are all pretty ripe and should be consumed quickly. So I started cutting them all up into nice slices (after washing them of course) and throwing them into a bowl.
Looking at my bowl of various stone organic fruits sliced up all nicely just waiting to become something, I remembered I had a left over already made pie crust rolled up and waiting in the fridge to also become something.
Eureka! I’ll make a rustic peach, nectarine, plum pie! I was excited now.
So I added to the bowl some lime juice (as that is what I had on hand, no lemons), a sprinkling of white sugar, a good tablespoon of cornstarch, a few shakes of cinnamon and nutmeg and a pinch of salt. I tossed it all together carefully and let it macerate in the fridge while I dealt with the pie crust.
I didn’t want to do a traditional pie, too much work and I didn’t have enough pie dough anyway. I also kept thinking back about 20 years ago (dating myself here) of a rustic apple pie I threw together that turned out delish! So, I find an old pie tin, unroll the dough, fix the few tears that happened (pie dough is so forgiving, thankfully) and poured the seasoned fruit into the middle of the dough. I roughly folded over the dough edges over the top of the fruit and brushed the dough with a beaten egg. I then sprinkled white sugar over the glistening dough and popped it into a 350º F oven.

Rustic Peach, Nectarine, Plum Pie before it was baked
35 minutes later… perfection! For $2! Organic perfection at that! It makes my bargain hunter heart and taste buds happy. 
One of the best things about this rustic pie is you don’t need a pie plate to make it. You can do it free form on the middle of a cookie sheet or heck, even a pizza pan. Whatever you have available.
Happy baking!
Rustic Peach Nectarine Plum Pie Recipe
Directions: Preheat oven to 350ºF. Clean, pit and slice the fruit into a large bowl. Add in the sugar, corn starch, lemon/lime juice, spices and salt and gently toss together. Put bowl in the refrigerator while you prepare your dough on the pie plate or cookie sheet of your choice. Pour the fruit mixture into the middle of the dough and carefully fold over the dough edges towards the center. It doesn’t have to be pretty. Beat the egg in a bowl and brush it over the dough and sprinkle it with a teaspoon or two of sugar. Bake in the oven for 30 to 35 minutes, depending on how big your pie is. The dough should be a nice golden brown when done. Let cool and enjoy!
A recent freebie I received as a BzzAgent (where I get the chance to try new products for free), was the new COPPERTONE® CLEARLYSheer™ Sunscreen plus coupons for FREE!

Coppertone ClearlySheer Sunscreen
I received a FULL size 5oz bottle, a 1.6oz spray on bottle and 3 – 1oz little bottles.
What I love the most about it is how easily it goes on and how quickly it’s absorbed into my skin, leaving it feel nice and silky, not oily or greasy like some other sunscreens. It’s also lightly scented, so you don’t smell like the beach all day. (Although, my teenage daughter says she likes the scent of regular sunscreens and misses that about ClearlySheer.) I really love the spray on bottle. It makes it super easy to spray on, rub in and go. I found my little one appreciated this fact as well. It has a matte finish so you can wear it under your make-up and it won’t clog pores or cause breakouts (clinically tested on acne-prone skin).
Most importantly it gives great coverage to help protect my family’s skin. No sunburns, yay!
I do believe I found my go to Sunscreen: Coppertone ClearlySheer

I love freebies! I stumbled upon this phenomenon several years ago when I was reading my beloved Reader’s Digest. They had a small section that talked about how to obtain things for free. In that article it gave a website that I quickly went to. That site was pretty neat; it listed links to sites that were offering ‘samples’ in a message board type format. It seems this site gathered its information from other ‘freebie’ sites and listed them. That’s how I found http://www.hunt4freebies.com. I checked out that site and I have never left. It’s a wonderful, well organized and dedicated site to not only freebies, but it has a section for coupons (downloaded and mailed), sweeps & good deals.
Everyday they post new deals, coupons but most importantly, FREEBIES!
I will happily post later about some of my freebie experiences, how it works and tips etc.

